Un buenísimo y simplecisimo articulo para empezar a codear con Node.js + ExpressJS.
https://freshman.tech/learn-node/
https://freshman.tech/learn-node/




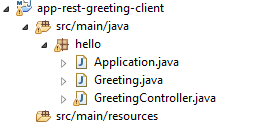
package hello;

import org.springframework.boot.SpringApplication;
import org.springframework.boot.autoconfigure.SpringBootApplication;

@SpringBootApplication
public class Application {

    public static void main(String[] args) {
        SpringApplication.run(Application.class, args);
    }
}
Luego creamos nuestra clase de entidad para los mensajes que tendrán una id y un contenido:
package hello;

public class Greeting {

    private final long id;
    private final String content;

    public Greeting(long id, String content) {
        this.id = id;
        this.content = content;
    }

    public long getId() {
        return id;
    }

    public String getContent() {
        return content;
    }
}
Bueno, y nuestro controlador REST de toda la vida:
package hello;

import java.util.concurrent.atomic.AtomicLong;

import org.springframework.stereotype.Controller;
import org.springframework.web.bind.annotation.RequestMapping;
import org.springframework.web.bind.annotation.RequestParam;
import org.springframework.web.bind.annotation.ResponseBody;
import org.springframework.web.bind.annotation.CrossOrigin;
import org.springframework.web.bind.annotation.RestController;

@RestController
public class GreetingController {

    private static final String template = "Hello, %s!";
    private final AtomicLong counter = new AtomicLong();


    @RequestMapping("/greeting")
    public Greeting greeting(@RequestParam(required=false, defaultValue="World") String name) {
        return new Greeting(counter.incrementAndGet(), String.format(template, name));
    }
}
- Ponle @RestController y no solamente @Controller, sino no va funcionarLanzalo clicando derecho en tu proyecto y seleccionando "Run As->Java Application" y vas a ver lo siguiente:4.0.0 org.springframework app-rest-greeting 0.1.0 org.springframework.boot spring-boot-starter-parent 1.3.0.RELEASE org.springframework.boot spring-boot-starter-web 1.8 org.springframework.boot spring-boot-maven-plugin


Hello AngularJS Your name: The ID is {{greeting.id}} The content is {{greeting.content}}
function Hello($scope, $http) {
    $http.get('greeting', {data: {name: name}}).
        success(function(data) {
            $scope.greeting = data;
        });

    $scope.update = function() {
        $http.get('greeting', {params: {name: $scope.name}}).
         success(function(data) {
             $scope.greeting = data;
         });
    }
}
The ID is {{greeting.id}}
The content is {{greeting.content}}
Lanzaremos el cliente y iremos a http://localhost:8080/index.html:

@SpringBootApplication
public class RestServiceDemoApplication {
   public static void main(String[] args) throws Exception
   {
       SpringApplication.run(TuNuevaAplicacion.class, args);
   }
}
Para probar rapidito, si tu aplicación va bien - eso es mejor método: lanzas y la Spring Boot se te lanza una instancia de Tomcat automáticamente. Pero q pasa, si lo tienes q desplegarla en otro servidor? Spring Boot te genera un JAR, pero otro servidor acepta solo un WAR para las aplicaciones web. Q hacemos?
Convertir JAR de Spring Boot en WAR es muy facil y asi lo puedes copiar y meter en la carpeta /webapps del servidor.
- Paso 1: tienes que añadir a tu clase principal la extensión de la clase SpringBootServletInitializer
@SpringBootApplication
public class RestServiceDemoApplication extends SpringBootServletInitializer
- Paso 2: tienes que añadir una implementación de un método de la clase SpringBootServletInitializer
@Override
protected SpringApplicationBuilder configure(SpringApplicationBuilder application) {
   return application.sources(RestServiceDemoApplication.class);
}
Codigo completo:
@SpringBootApplication
public class RestServiceDemoApplication extends SpringBootServletInitializer {
   @Override
   protected SpringApplicationBuilder configure(SpringApplicationBuilder application) {
      return application.sources(RestServiceDemoApplication.class);
   }
   public static void main(String[] args) throws Exception {
      SpringApplication.run(RestServiceDemoApplication.class, args);
   }
}
- Paso 3: anadir a pom.xml el packaging
y la clase principal en los "properties"war
ahora puedes crear el package o desde Eclipse, o desde la linea de comandos: - mvn package Maven te dira, donde el WAR sera creado: normalmente hay una carpeta target en la carpeta de tu proyecto. Toma este WAR para desplegarlo en tu servidor:com.example.restservicedemo.RestServiceDemoApplication


